General information
Exports can be created and edited via the ITscope platform.
A limit of exportable products applies for each data export.
The export defines the data that should be exported. Exports are always carried out upon explicit request, either manually through the export management or via the ITscope API. It is not possible to specify an export schedule on the platform. More information regarding this can be found in the Exporting chapter.
Create exports
Export management
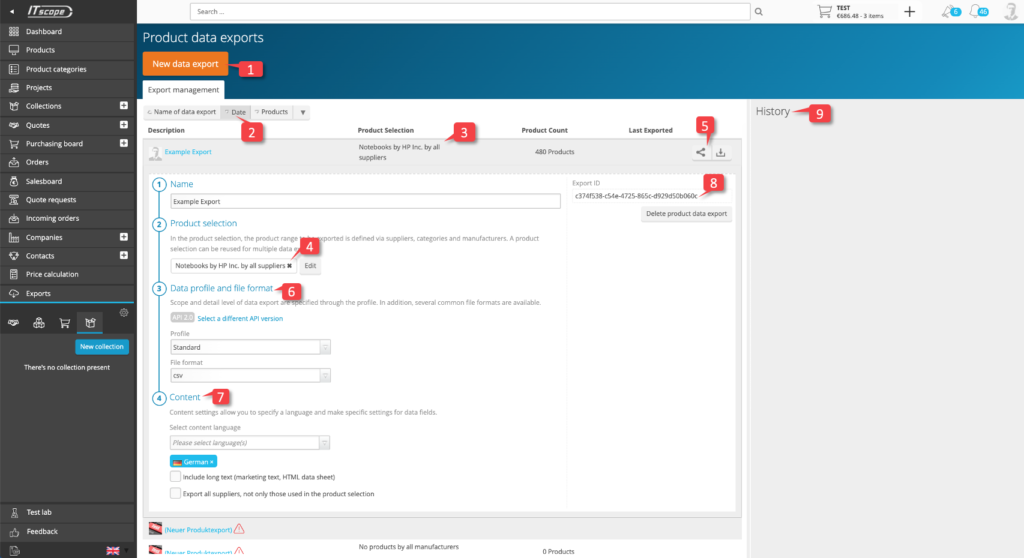
The export management section of the platform can be opened via the ‘Exports’ menu item on the navigation bar. All data exports from your company are listed in the export management. A history of all exports that have been carried out is displayed on the right (9). Here you can see status, date, name, API version, file format and the number of products involved in the export. Clicking on one of the exports in the history list will show additional information about the export, such as the Log ID for support purposes.
A new export definition can be created with the ‘New data export’ button in the header area (1). Existing export definitions are displayed in a list depending on selected sort criteria (2). Clicking on a line in the list (3) will open or close the export definition. One of the most important functions of an export definition is to specify the product selection (4).
Exports marked with a warning symbol have been incorrectly defined in some way. This means important information is missing which is preventing correct execution of the export, for example a missing or invalid product selection.

Export definition
An export definition determines which products are to be exported in which format.
For each export, there is a line (3) in the overview that contains all information identifying the export. This includes the name, the product selection, the number of products and the time of the last export. In addition, the export can be started manually using the download button (5). The ‘Share’ button (5) provides a URL link that can be used to retrieve the export via the API. This URL contains the unique identifier of the export, among other things.
The export line (3) can be expanded and hidden with a click. The export definition can then be edited accordingly.
An export definition consists of the name, the product selection and the data format. The export ID (8) is used to uniquely identify the export, for example it is contained in the download link for an API call. The person initiating the export is also named for each export. There is also a button for deleting the export definition.
Set product selection
Each export must contain a valid product selection (4). The product selection determines how the products to be exported are chosen out of the whole product range.
In the detailed (expanded) view of the export definition, an existing product selection can be selected, an assigned one edited, a new one created or an existing selection removed.
For a newly created export definition, no product selection has been entered yet. A selection box allows you to choose from a list of previously created product selections. For the very first export, no product selection will have been created yet. Therefore, a new product selection has to be added first by clicking on the button ‘Create’ to the right of the selection box. If a new product selection is created or an existing one is edited, then the product selection will open in a separate tab within the export management. The process of defining a product selection is described in the section ‘Edit product selection‘.
If a product selection has been assigned, the name of the product selection is displayed instead of the selection box, and there will be an edit icon to the right. The edit icon will open the definition of the product selection. To remove an existing selection, click on the ‘x’ next to the name of the product selection. Afterwards the selection box will be visible again, allowing another product selection to be assigned or a new one to be created with the ‘Create’ button.
Set data format
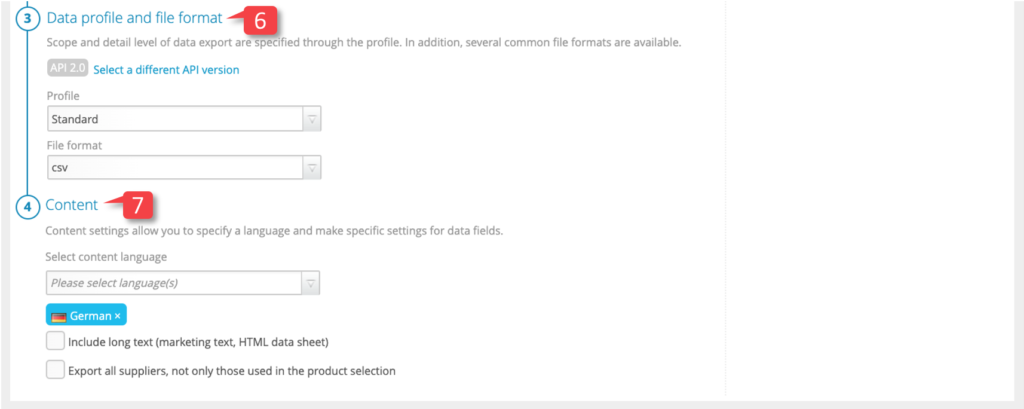
The API version can be set in the ‘Data profile and file format’ section (6). Depending on the API version, different data profiles are available. There are differences in the data profiles and export fields between API 1.0 and API 2.0.
The data profiles of the API 2.0 and API 2.1 have not changed, but there are differences in the respective fields contained in the data profiles.
The product export can be delivered in varying data profiles. The following data profiles can be chosen from the selection boxes:
- Standard (json, xml, csv)
- Standard – price/availability update (json, xml, csv)
- BMEcat1.2 (xml)
- BMEcat1.2 for Meplato (xml)
The choice of data profile determines which fields appear in the export. Fields cannot be selected individually. The profiles are designed to output all fields relevant for the respective case.
Set additional content
The content data (mainly text) in the export can be exported in different languages (7).
The following six languages are available:
- English
- German
- French
- Italian
- Dutch
- Spanish
Please note that depending on the data format, the following rules apply:
- standard – only one language selectable at a time
- standardUpdate – only one language selectable at a time
- BMEcat1.2 – up to six languages (i.e. all languages) selectable
- BMEcat1.2 for Meplato – up to six languages (i.e. all languages) selectable.
The check boxes below the language selection (7) allow further configuration of export contents:
- Include long text: this option is used in the export to fill the htmlSpecs (HTML datasheet) and marketingText (marketing texts) text data fields with content. Since these texts can be very large, it is possible to deselect them separately in order to reduce the file size of the export.
- Enable export log for filtering products. Adds log output to the export. Please note that this option increases the file size Checking this box adds additional log entries to the export (in the log.csv file for CSV formats, in the log element for XML and JSON). These log entries list the reasons why products or sources were filtered out of the export. When log entries are enabled, the download file becomes considerably larger. Therefore, the logs should only be enabled if you want to check why products and sources of supply are missing from the export.
- Use alternative supplier article numbers (SKUs) in BMEcat, here you have the option to export the supplier article number (product ID) of a supplier of your choice instead of the ITscope product ID.
- In the event that certain product IDs do not exist for your selected supplier, they can be exported with the ITscope product IDs instead, via the option ‘Also export products without alternative supplier article number‘.
- Select classification system(s) for BMEcat, here you have the option to select different classification formats for your export. The following formats are currently available:
- eCl@ss 10.1, eCl@ss 5.1.4, eCl@ss 7.1 and eCl@ss 8.1
- ETIM 7.0 Electrical
- ITscope
- UNSPSC 20.0601
The choice of classification systems is intended to help you choose the right product classification standard for your industry. Multiple classification systems can be selected. The choice of classification system is highlighted in blue.
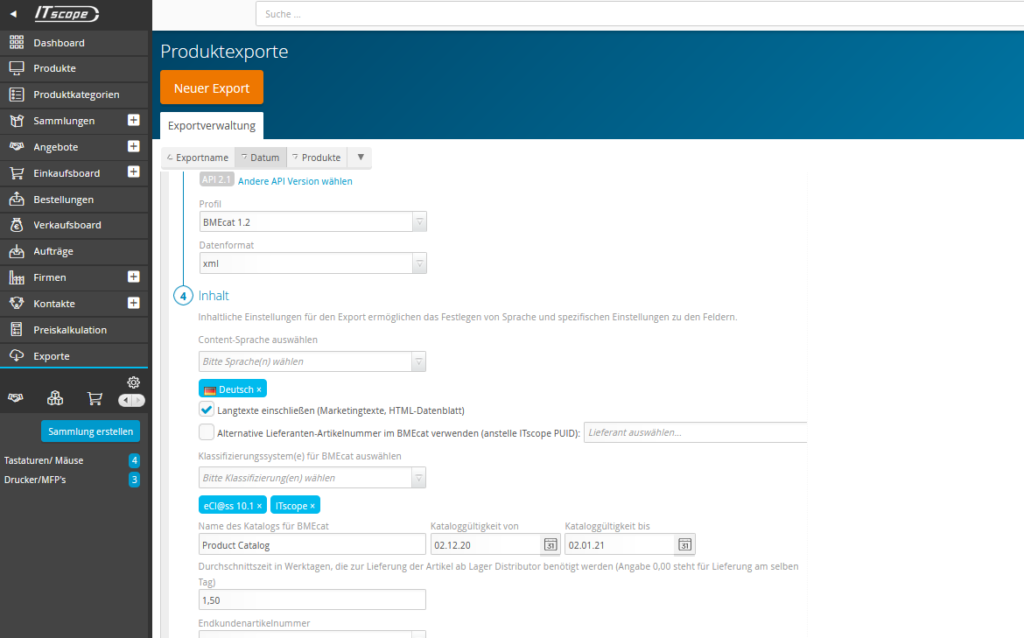
- Via ‘Name of the catalogue for BMEcat‘ and the ‘Catalogue validity from‘, as well as ‘Catalogue validity to‘, you can assign a specific name and a validity period for the export.
- The average time in working days indicates the time needed to deliver the items from the distributor’s warehouse. It is also possible to specify half days. Example: 0.50 corresponds to half a day.
Important! The following must be taken into account for the calculation of the delivery time:
1. The average time in working days corresponds to the delivery time if you have the product OnStock, i.e. in stock
2. If the product is stored in an external warehouse (Warehouse), the entered average time in working days is multiplied by the factor 1.75. Example: 2.50 * 1.75 = 4.375, i.e. 4 days average delivery time
3. If the product is OnOrder, i.e. in incoming delivery, the average time entered in working days is multiplied by the factor 2.25. Example: 2.50 * 2.25 = 5.625, i.e. 6 days average delivery time
4. If the item is not available (NotAvailable), the following will be output in your export:
Mercateo – 1000 days average delivery time
Meplato – 300 days average delivery time
- The end customer article number (SKU), if available, specifies the product selection for your customers.
- Keywords: if no end customer article number (SKU) is found, keywords can be exported. These help to improve the findability of the products. Example: Lenovo, laptop, …
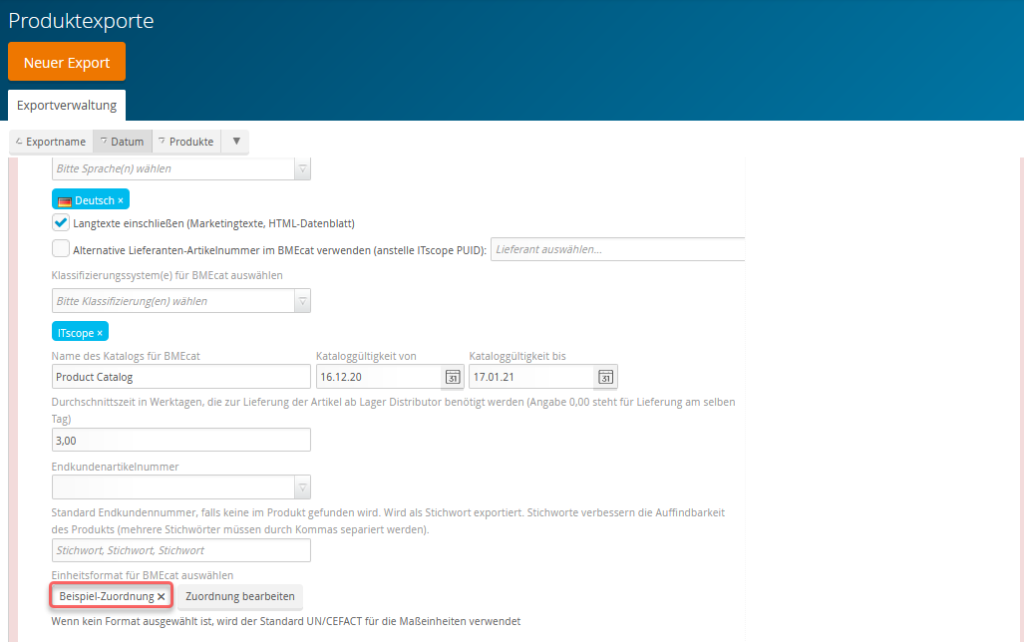
- Last but not least, you can also select the packaging unit format for BMEcat, which must be added as a new mapping if this differs from the standard UN/CEFAT format. To find out more, read the section on Selecting the format of units for BMEcat below.
Exporting
Currently, there are three ways to start an export:
- Directly on the platform in the export definition via the download button, which will download the export directly in the browser. This variant is self-explanatory and mainly serves to check the export.
- The API can retrieve the export via the URL link. This URL link can be accessed by clicking on the ‘Share’ button in the export definition.
- By programming an API call to automatically initiate an export.
UOM – selecting the format of units for BMEcat
The customisation of units of measurement in the BMEcat export gives you the necessary flexibility in mapping units.
The UN/ CEFACT format is set as the default format for all units of measurement.
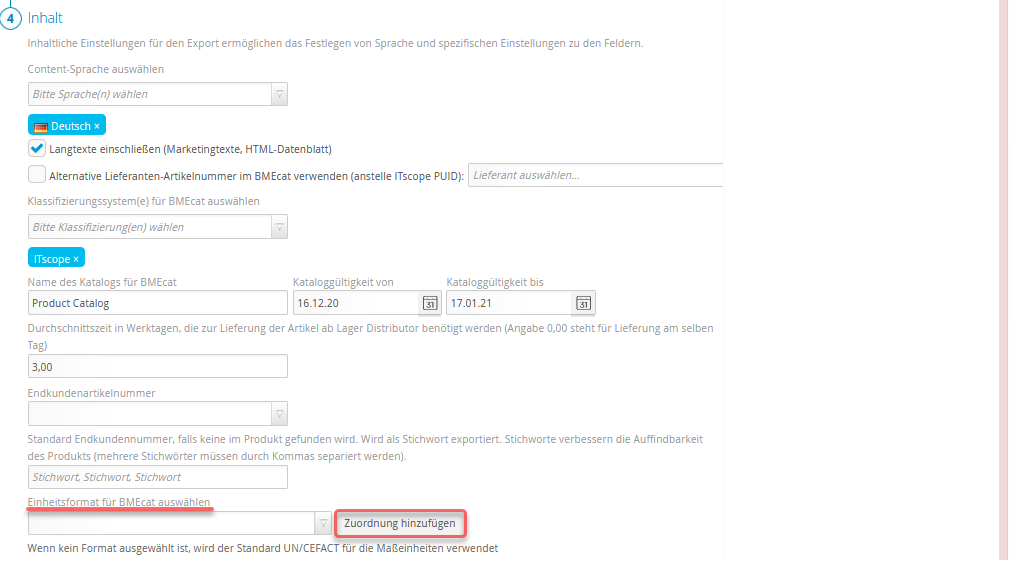
You can create a new mapping via the Add assignment button. The following dialogue box opens:
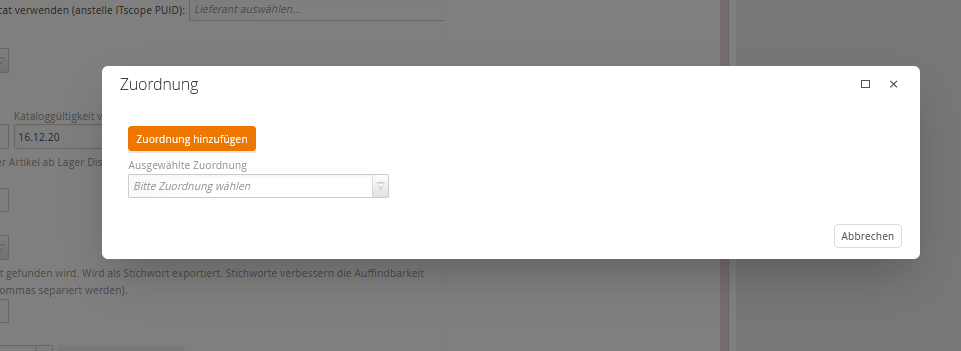
If you have already created an assignment that differs from the standard, you can select this using the Selected assignment drop-down field.
If you have not created a mapping yet, you can do so via the Add assignment button. The following dialogue box opens:
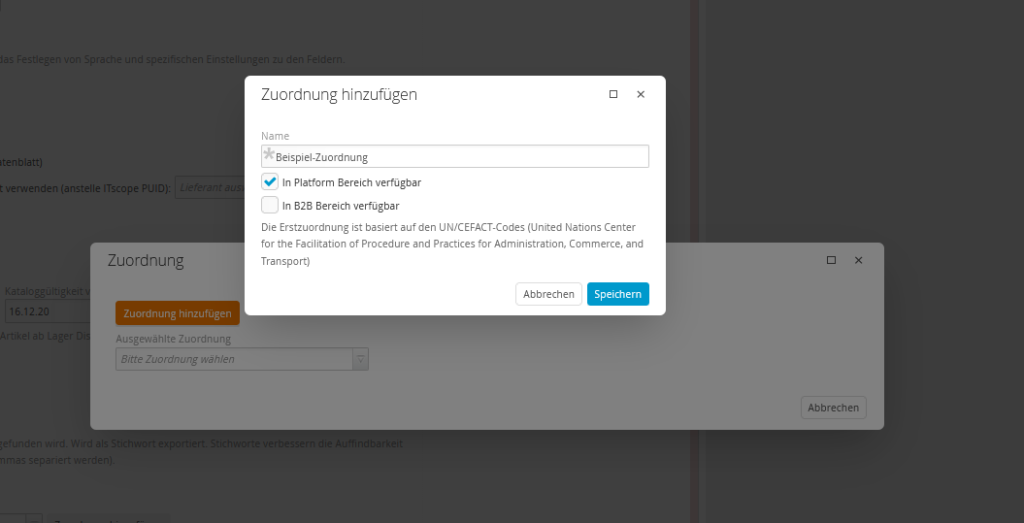
Here you can provide a name for the new assignment.
Additionally, you can decide whether the assignment should apply exclusively to your customers and partners on the ITscope platform, or also to your customers and partners in the ITscope B2B Suite, i.e. your B2B portals. You can adjust these availability/scope settings at any time afterwards.
You can then use the Selected assignment drop-down menu to select the newly created assignment and edit it accordingly. The following window opens in the dialogue box:

In this dialogue box, you can see all the units of measurement that are part of the standard UN/ CEFACT format.
- Description: the description contains an worded description for the corresponding unit of measurement. In the top field – Search– you can search for a specific description.
- Standard code: the standard code refers to the units of measurement as defined by the UN/ CEFACT format. In the top field – Search – you can search for a specific standard code.
- User-defined code: the user-defined code is the change/adjustment/deviation you want to make or have made from the standard code. If the user-defined code contains the same content as the standard code, then this will be interpreted as the unit of measurement for your assignment. Using the field at the top – Search – you can search for a specific custom code.
Important! Only a unit of measurement that has been edited will have an effect on the assignment of unit formats. Without adjustments, the standard UN/ CEFACT format is used!
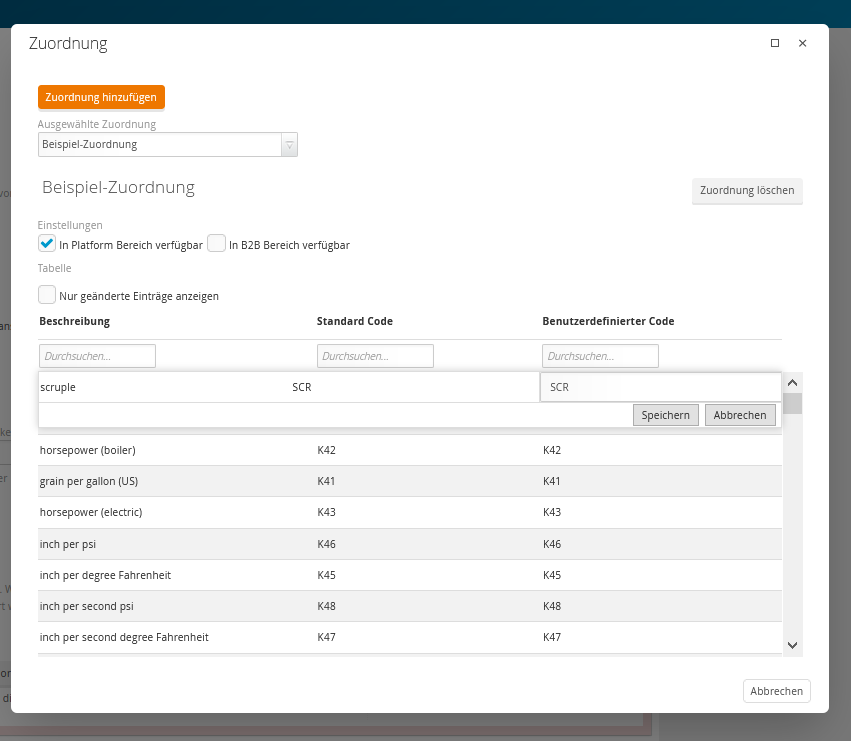
To change the assignment of a particular unit of measurement, double-click the corresponding unit of measurement.
You will then have the option of adjusting the user-defined code and saving it using the Save button, or discarding the change using the Cancel button.
Similarly, you can also make adjustments to all units of measurement from the UN/ CEFACT standard as required.
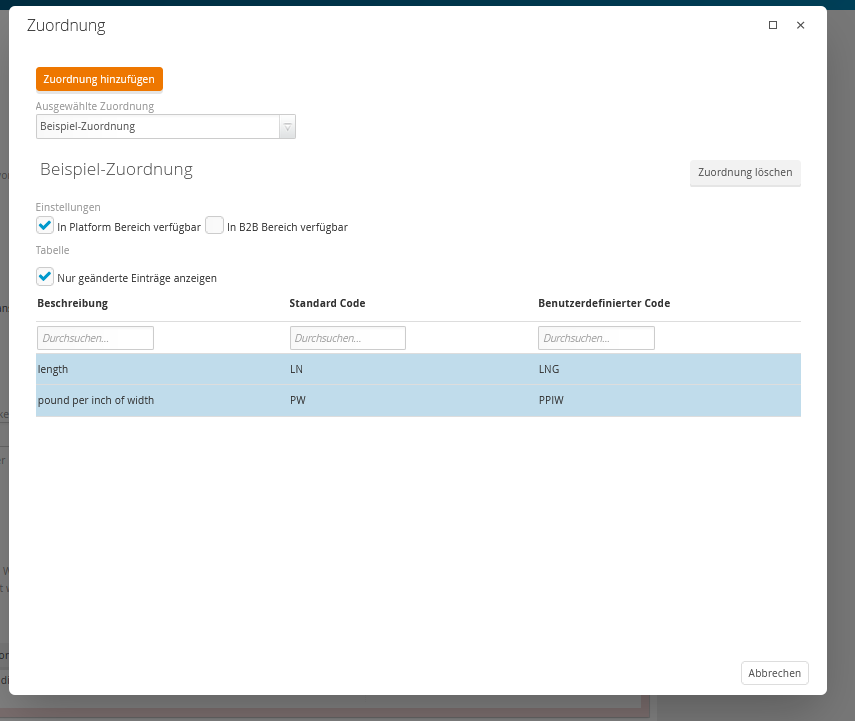
To keep track of the units of measurement you have changed, you can choose to only display edited entries by selecting ‘Show changed entries only‘.
This way you can see the changes you have made from the standard unit(s) at a glance.
After following the above steps, you can then select the desired individual unit mapping for the export: