What are webhooks?
A webhook is a non-standard HTTP request that is triggered when something happens in the originating system.
In the case of ITscope, this occurs when new deal or order response documents become available. For example, if a distributor A provides a new delivery note for an order from customer B, a webhook with this information will be sent to the corresponding URL (if everything has been configured correctly).
Structure
ITscope’s webhooks are structured according to the following scheme:
| eventId | ID of the sent webhook |
| timestamp | Timestamp of when the webhook was sent |
| eventType | Type of document that triggered the webhook. Possible values are ORDER, ORDERRESPONSE, DELIVERY and INVOICE |
| transactionStatus | New status of the order or deal (e.g. ARRIVED or PROCESSING) |
| orderId | ID of the order or deal |
| itscopeOrderId | ID of the order or deal assigned by ITscope |
| documentId | ID of the document that triggered the webhook |
| documentUrl | URL to access the actual document via ITscope API |
| transactionId | ID of the transaction |
A webhook for a new dispatch notification could, for example, look like this:
{
  "eventId": "e2a6a466-3b62-4bb7-af53-b59aec592b49",
  "timestamp": "2023-10-17T11:01:36",
  "eventType": "DELIVERY",
  "transactionStatus": "ADVISED",
  "orderId": "123-SAMPLE-456",
  "itscopeOrderId": "SAMPLE-123456-789",
  "documentId": "123456789",
  "documentUrl": "https://api.itscope.com/2.1/business/documents/123456789-1234-5678-9123-12SAMPLE4567/DISPATCHNOTIFICATION.xml",
  "transactionId": "123456789-1234-5678-9123-12SAMPLE4567"
}
Set up

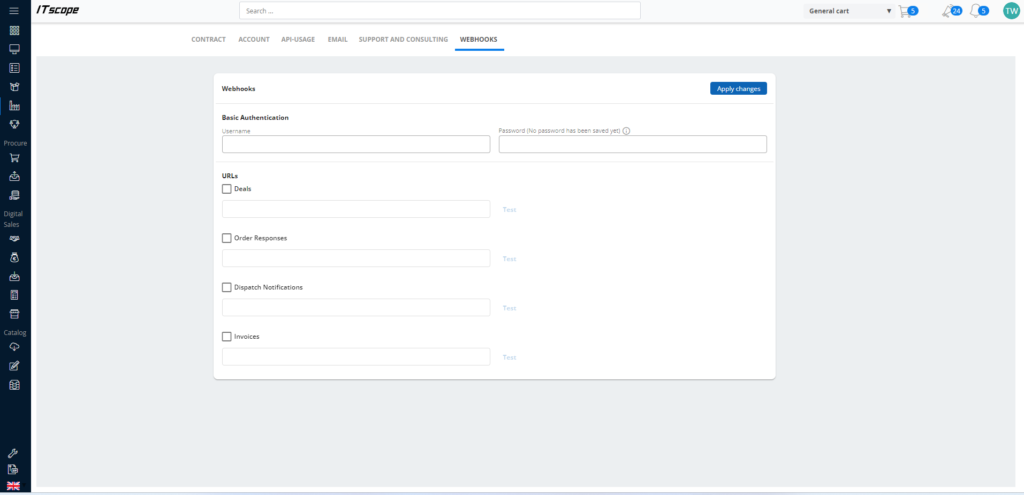
The webhook settings can be accessed in the header bar above the profile picture on the right > My Account > Webhooks tab. This page is visible to all users. Changes can only be made if the executing user is a company admin and if the necessary modules have been purchased in the company’s contract. These are “Business API” for old contracts and either “Individual API integration” or “Standard integration” for new contracts.
The settings are roughly divided into two areas:
- The access data for the target system can be entered in “Basic Authentication” so that the webhooks can be sent with them if the server of the entered URLs expects such authentication. If a password has already been stored, this will be indicated by a note in the input field. The actual password is not displayed. If the password field is left blank, this information will not be transferred when saving and the old password will remain.
- The links to which the respective webhooks should be sent can be entered under URLs. To do this, the respective checkbox must be selected and an https URL must be entered. Only when both are fulfilled will the webhooks be sent. A dummy webhook can be sent to the entered URL using the “Test” button.
The webhook settings are only saved once the “Apply changes” button has been clicked.
